Author Archives: Jen

On avocados…

Avocado

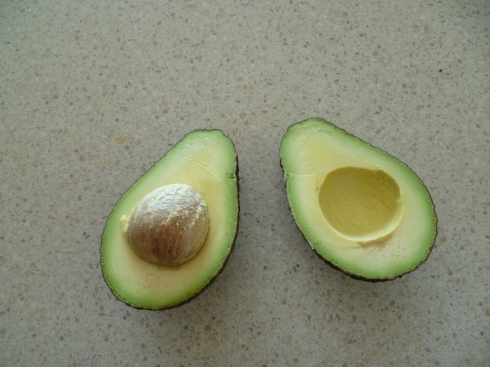
Cutting an avocado in half to find the inside like this makes me happy. It’s a small joy in my life.

Here’s a true fact: once, my grandfather accused my mum of not being good at picking avocados, and she swears that since then she’s been cursed to only pick bad ones. I think this is pretty unfair – she taught me how to pick an avocado and I seem to have a pretty good hit rate. So, the lesson is, beware the power of accusing someone of not being good at picking avocados. Not sure if this extends to all fruits, so be careful. It could, however, also be a powerful tool for smiting your enemies. Or, if not smiting, slightly inconveniencing them. I guess you could cope with a lifetime of brown stringy avocados, but really, what kind of a life would that be? Sub-optimal.

Here’s another one: I once made a birthday card for a friend who loved avocados that said ‘Avocado on your birthday’. Get it? Like, ‘Have a card-o on your birthday’. Because it was a birthday card. They didn’t get it, or they didn’t think it was funny, I can’t remember which, but it was probably a combination of both. I would like to point out that I was about 10 years old.

That’s all I have to say about avocados. For now…


Chocolate freckle cupcakes and a rant about competitive baking

chocolate freckle cupcakes

Last year I entered the Ekka baking competition. I didn’t expect to win, but it seemed like a fun thing to do. After months of testing recipes on friends, family, housemates and workmates, I figured my banana bread, pumpkin scones and jam tarts were as good as they were going to get. When the big day arrived, I dropped off my entries and anxiously waited for the results. I still didn’t expect to win, but I secretly hoped I’d be surprised. I wasn’t. But that was ok, I figured, I can’t have done that badly. Perhaps I came fourth? Then I got the feedback in the mail weeks later. It was harsh. Like, unnecessarily harsh. And vague. The feedback for my banana bread said ‘More attention to baking required. Maybe try a different recipe’. Ouch. I’m pretty sure it wasn’t that terrible. Everyone who’d tried it seemed to think it was ok. I was disheartened, and decided that competitive baking was clearly not for me.

But then I received the entry forms for this year’s Ekka. For some reason this made me feel all warm and fuzzy, like I was part of a community. And what if these types of competitions died out? That would be sad, right? So I decided I’d enter again, but in the novice category. And I’d only enter one thing – cooking three things the night before entries were due had been a mistake. So I decided on the chocolate bar cake, sent off my entry form, paid the fee and promptly forgot all about it. Unlike last year, when I tested and refined my recipes for months, this year I did nothing by way of preparation. On the weekend before the entries were due I thought I probably should a) find a recipe and b) do a test run. So I did, and it came out looking like a giant turd.

Behold:
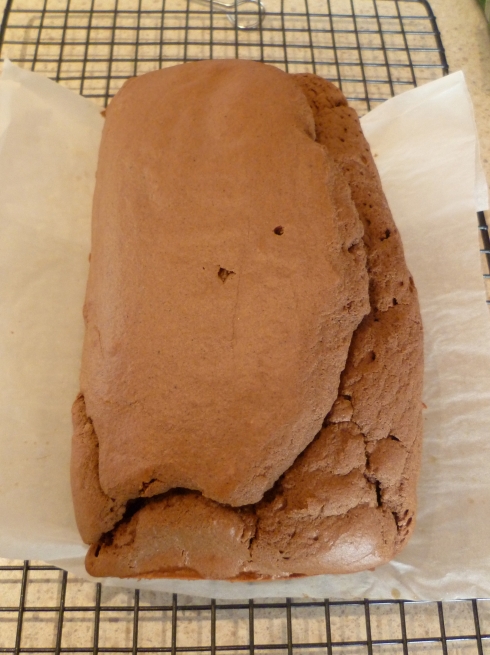
chocolate turd cake

Iced, it just looked like a shiny (polished) turd:

iced chocolate turd cake

This was no good.

I couldn’t decide if I should bother entering. At around 10pm on the night before entries were due, I decided I would give it crack. But when I tried to get the cake out of the tin and it left a huge chunk behind, I gave up. Imagine the nasty feedback I’d get about a cake with a hole in it? But the recipe itself was pretty good, so I played with it a bit more and decided it was better in cupcake form with sprinkles. I also decided that competitive baking is stupid and it was probably a good thing if it died out. It’s such an oddly prescriptive form of baking, with all the fun removed. I can never figure out exactly what they want – can I cook any kind of chocolate cake I want or does it have to be a ‘traditional’ one, and what does that even mean? I swear, some of the categories say you need to enter a cake with a ‘good flavour’. WTF does that actually mean? And I don’t really know what a ‘nice crumb’ is, or understand why having a domed or cracked cake or testing it with a skewer is so bad… In short, because I’d failed I felt like I could write off the entire concept of competitive baking. I figure I can make a perfectly acceptable ‘rustic’ looking cake if I need to and I don’t care if it doesn’t meet the high standards of some uppity CWA bitches Ekka judges.

But, I digress. The outcome of this whole adventure was a recipe for nice, light, simple cupcakes. They taste like old school chocolate cakes. There’s nothing new fangled and fancy in them, like, I don’t know, almond meal and real chocolate, which seem to be all the rage in chocolate cakes these days.

Chocolate freckle cupcakes
This recipe is an amalgamation of numerous recipes from the internets.
Makes 18

125 g unsalted butter
1 1/2 cups plain flour
1/4 cup and 1 tbs cocoa powder
3 tsp baking powder
1/2 tsp bicarb of soda
1 1/4 cups sugar
2 eggs
1 cup buttermilk
1/2 tsp vanilla essence
splash of rum (optional)
cupcake cases

Chocolate icing
Adapted from David Herbert’s The Really Useful Cookbook

50 g unsalted butter
1 cup icing sugar
1/4 cup cocoa
1 tbs boiling water
sprinkles

Preheat the oven to 180°C. Line a muffin tray with cupcake cases.

Put all the cake ingredients in a bowl and beat with an electric mixer until well combined. Pour the batter into the cupcake cases. Bake for about 20-30 minutes, or until a skewer (that’s right, a skewer) stuck into the cake comes out clean.

Remove from the oven and cool completely before icing.

For the icing, put all the ingredients in a food processor and blend until combined. If it’s still a bit thick or not combining properly, add another tablespoon of boiling water.

Ice the cupcakes. Put some sprinkles in a bowl. Press the iced cupcakes in the bowl (one at a time) until the top is completely covered with sprinkles.

Done.

If, like me, you were lucky enough to be given an amazing cupcake holder for your birthday by an awesome friend, you can pop one (or two) of these suckers in it and take it to work with you.

cupcake holder


Cracker, please

Rosemary and olive oil crackers

I made my own crackers the other day. I was was going to a picnic, and I decided that if I made my own stuff I wouldn’t have to go to the shops. It’s kind of reverse laziness because going to the shops and buying crackers would have taken far less time. Still, it was pretty easy and the crackers were just as good as any I’ve ever bought. They’re hardly a main feature anyway; they’re really (if we’re honest) just a vessel for carrying dips and cheese. If cardboard were crunchier you could probably just cut it into squares and sprinkle salt on it and no one would notice. That’s not to say I don’t appreciate a good cracker, I’m just realistic about what their function is… and perhaps I tend to overload them.

These crackers did actually taste nice though, and if you have the time and want to boast to your friends that you made crackers from scratch (don’t tell them it’s easy), they’re worth making. Or if you’re on a tight budget and/or don’t like leaving the house more times in one day than absolutely necessary or interacting with the wider community, these are for you.

As a side note, crackers always make me think of this:

Rosemary and olive oil crackers
Adapted from the book Jam It, Pickle It, Cure It: And Other Cooking Projects by Karen Solomon
Makes about 70 crackers

1 3/4 cups plain flour
1 tsp baking powder
1 tsp sugar
1 tsp salt, plus extra to sprinkle on the tops of the crackers
1/2 tsp cracked black pepper
1 tbs rosemary leaves, chopped finely
1 egg
1/3 cup olive oil
1/2 cup water

Put all ingredients, except water, in a food processor and blend until the mixture looks like breadcrumbs. Slowly add water, one tablespoon at a time, until the mixture starts to form a ball, like this:

Cracker dough in food processor

Pull the dough out of the food processor and shape it into a ball with your hands. You might want to cover them in a bit of flour first.

Cracker dough

Cut the dough in half and shape into two square-ish pieces, kind of like this:

Cracker dough squares

Wrap each of the pieces in plastic wrap and refrigerate for half an hour.

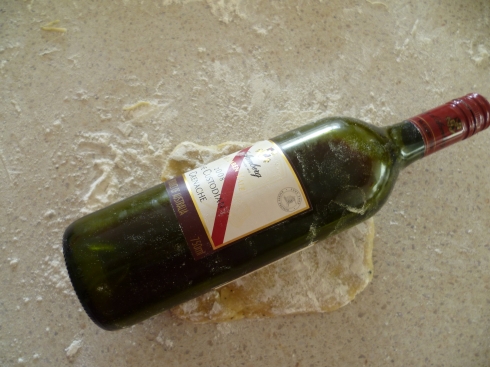
Preheat the oven to 180°C. Take the dough out of the fridge, and, one piece at a time, roll out on a floured surface until thin. I made mine pretty thin, about a couple of millimetres, but you can make them thicker if you want – you’ll just need to bake them for longer. Try to keep the dough relatively square. If you don’t have a rolling pin, I find a wine bottle works just fine, and luckily, there’s always one on hand…

Rolling pin

When you’ve rolled it out, cut it into squares (or whatever shape you want). I used a pizza cutter and the baking paper box to make somewhat uniform crackers. Prick each cracker with a fork a couple of times.

Measuring cracker dough

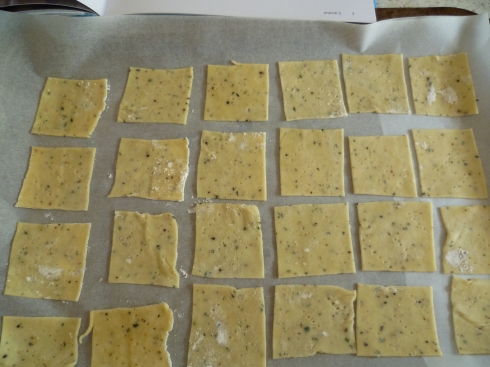
Carefully transfer the crackers onto a baking sheet lined with baking paper. They can be pretty close together when you bake them.

Crackers on baking tray

Sprinkle each cracker with a little bit of salt and bake for 12 minutes or until golden brown. This can take up to 20 minutes if you have thick crackers. Remove from the oven and let cool on a baking rack. Once they’re completely cool you can store them in an airtight container. Apparently they last up to a week, but mine were eaten in three days.


Pumpkin: it’s not so bad

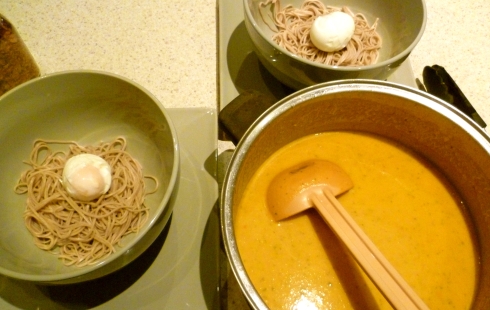
Thai pumpkin and noodle soup - with an egg

I didn’t like pumpkin until July 2007. I can pinpoint the month and year because that was when delicious. featured a recipe for pumpkin, sage and ricotta lasagne. For some reason I was drawn to it, despite having never wanted to eat pumpkin before. I made it and loved it, probably in no small part because of all the cheese, and I started to think maybe I was wrong about pumpkin; maybe it wasn’t disgusting. So I experimented with other pumpkin recipes. As long as the pumpkin is blended and mixed with other things, I like it. Big chunks of pumpkin still gross me out. They’re so squishy and kind of weirdly stringy… bleh.

Last winter I made pumpkin soup for the first time. My mum thought this was unfair – I’d refused to eat it when I lived at home, so she didn’t get to make it. But she did tell me that you could also put coconut milk or cream and coriander and chilli in it to make a Thai-flavoured pumpkin soup. And finally, three weeks ago when I planned to make pumpkin soup but didn’t want to go to the shops to buy cream and realised I had all the Thai stuff in the house, I decided to give it a try. I was pretty pleased with the results, but I decided it needed noodles. I also thought it would be good with soft boiled eggs and fried shallots. This was inspired by Alice Hart’s recipe for sambal telur in the June 2011 issue of delicious.

This is hardly authentic Thai – to start with, I used a jar of Thai curry paste. Also, I’m pretty sure sambal oelek is Indonesian, the eggs are from a Malaysian recipe, and soba noodles are Japanese… So I’m not quite sure what the best name for it is. It’s kind of a Thai(ish) curry-flavoured pumpkin and noodle soup with an egg. My boyfriend gave me two options for the name: ‘journey to the centre of ecstasy’ (he really likes this soup), or ‘soup egg noodle’. I think I’ll go with the second one, the first one is a lot to live up to.

Soup egg noodle
Serves 4

3 tomatoes
2 tbs vegetable or peanut oil
5 garlic cloves, finely diced
3 cm piece of ginger, finely diced
1 green chilli, chopped (with seeds)
1 brown onion, finely diced
1 tsp chopped coriander roots
1 kaffir lime leaf
1 tsp red curry paste
1 tsp sambal oelek (Indonesian chilli paste – leave this out if you don’t want it to be hot)
1 tsp tamarind paste
800 g Jap pumpkin, cut into chunks, skin removed
1.5 L vegetable stock
juice of half a lemon or juice of one lime
1 tbs brown sugar
2 tbs chopped coriander leaves (and Thai basil leaves if you have some)
270 ml coconut cream
180 g soba noodles
4 eggs
fried shallots, to serve

Cut a shallow cross in the base of the tomatoes (ideally it should just cut the skin). Place the tomatoes in a bowl and cover with boiling water. Let them sit for a couple of minutes, then pour out the hot water and replace it with cold water. Leave for a couple of minutes until cool. Carefully peel off the skins and cut the tomatoes into wedges.

Put oil, garlic, ginger, chilli, coriander roots, onion and kaffir lime leaf in a large pot over medium heat. Cook until onion starts to soften. Add curry paste, sambal oelek and tamarind. Stir for a minute, then add the tomatoes, pumpkin and stock. Simmer until pumpkin is really soft – about half an hour.

While the soup is simmering, cook the noodles and eggs. For the noodles, follow the instructions on the packet – usually this just means add them to boiling water for a few minutes then drain and rinse under cold water. Set aside.

To cook the eggs, put them in a small saucepan (that has a lid) and cover them with cold water and bring to the boil. As soon as the water has boiled, cover the pan with the lid and leave it to stand for 6 minutes. Pour out the hot water and fill the pan with cold water. When the eggs are cool enough for you to handle, carefully peel the shells off. Set the eggs aside with the noodles.

Add lemon or lime juice, sugar, coriander leaves and coconut cream to the soup and stir until combined. Remove the soup from the heat and blend until smooth.

To serve, divide noodles into four bowls (you might need to rinse them in cold water again if they’re stuck together). Place an egg on top of the noodles in each bowl, and then pour over the soup. Top with fried shallots.


Tiny pineapple with coconut pikelets

Tiny pineapple

My dad gave me this tiny pineapple for my birthday. It’s from the pineapple plant I gave him a while ago. Look how small it is – you could fit it in your pocket!

No, really, look how small it is:

Tiny pineapple with strawberry

It’s the same size as a strawberry! Hi-larious.

Dad suggested I put it on the blog, so here it is. I figured I should actually do something with it, other than put it next to a strawberry and giggle to myself. So, what does one do with a tiny pineapple? There aren’t too many options. I decided something pina colada adjacent would be good. And something quick. To my mind, the coconut pikelets were a stroke of genius. I’m sure I’m not the first person to have the idea, but I was particularly proud because they came out pretty well and I just used ingredients I had in the pantry. It always feels like an achievement when I make something that tastes good and I don’t have to leave the house for ingredients. (I’d like to say this is where the inspiration for the name Paddington pantry came from, but, sadly, I’m not that clever.)

Coconut pikelets
Serves 2

1 cup plain flour
1 tsp baking powder
1/4 cup shredded coconut
2 tbs caster sugar
1/2 cup coconut milk
1 egg
25 g unsalted butter, melted

Caramelised pineapple
One tiny pineapple, skin cut off, halved
25 g unsalted butter
2 tsp brown sugar

Mix the dry ingredients together with a whisk. Add the coconut milk, egg and the butter and whisk until combined. If it’s a little bit thick, add more coconut milk, or add a bit of water.

Heat a non-stick frying pan over medium high heat. I usually spray it with a little bit of oil too, mostly because I don’t trust non-stick pans to actually be non-stick.

Cook pikelet-sized spoonfuls of batter for a couple of minutes on each side until golden brown.

Meanwhile, for the caramelised pineapple, heat butter and brown sugar over a medium heat. When the butter has melted, add the pineapple and cook on both sides until brown.

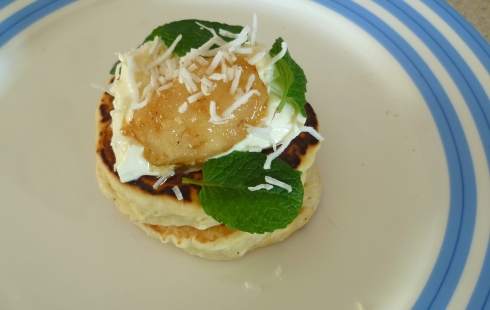
We had the pikelets with yoghurt, mint leaves and strawberry jam. I did the food styling (I use the term loosely) for this one:

Tiny pineapple and coconut pikelet - my styling 

While my boyfriend did this:

Tiny pineapple and coconut pikelet - Mr Gaunt's styling

I will hereby be handing over the food styling and photography for this blog to him. In my defence, his looks better because he used my homemade strawberry jam…


Scarface

scarface

Whenever I find an ant in the sugar it makes me think of Scarface. I bet this ant (Anty Montana? Tony Montanta?) is having the time of its life at the moment, but it will soon become paranoid and alienate all its friends. This can only end in tears. And violence.


Onion bhaji

Onion bhaji

I haven’t blogged in a while. While this is largely because of laziness, it’s also because I’ve been busy chasing a recipe around the internet, tracking it’s changes over time and over blogs, and this has taken up a bit of time and a lot of brain space. It’s part of my masters, and hopefully I’ll write something about it soon.

In the meantime, here’s a recipe for onion bhaji.

Both times I’ve made onion bhaji I’ve served it with dhal and rice. This is really just to maintain some sort of pretense that I’ve made a proper dinner. If I didn’t feel like I have to act like an adult at least some of the time, I would happily eat a whole plate of onion bhaji and leave the dahl. It’s not that I don’t like dahl, it’s just that it’s not fried onion, so, well, it’s just not as good. I’ve made it with dahl with spinach and red lentil dahl with spinach. I preferred the red lentil one, and it was also quicker to make.

Onion bhaji
Slightly modified from the The Cook and the Chef recipe.
Should serve at least four…

1/2 cup plain flour
200 ml plain yoghurt
1 tsp garam masala
1 tsp ground cumin
1 tsp chilli powder
1/2 tsp turmeric powder
1/2 tsp caraway seeds
Pinch of salt
4 onions, sliced into rings
1 tbs lemon juice
1/2 cup chopped coriander leaf
1 green chilli, chopped
Vegetable oil for deep frying

Whisk yoghurt, flour, spices and salt together until combined. It should be about the consistency of pancake batter. Leave in a warm place for a few hours.

Add onion, lemon, coriander and chilli to the yoghurt mix and stir until combined and onion is evenly coated in batter.

To fry, I heat about 5 cm of oil over a high heat in the tallest big pot I have. I use a tall pot so the oil doesn’t spit out as  easily. Here it is, the one at the front:

Frying onion bhaji

When the oil starts to look really thin and I can see small bubbles, I (very carefully) slip tong-fulls (is that even a term?) of the onion mixture in. The tongs seem good because the excess batter comes off in the bowl, and I can then use them to turn the onion over in the oil so they cook evenly. Fry until dark golden brown, which doesn’t take long, and then scoop out the bhaji and place on a plate covered with paper towel to drain the excess oil. The whole procedure is a little terrifying, to be honest, what with the hot oil and my habit of hurting myself in the kitchen, but the reward is awesome. Especially if there is enough left over for me to make an onion bhaji and dahl bento for lunch:

Onion bhaji and dahl bento


Chocolate raspberry brownies

Chocolate raspberry brownies

Who doesn’t love brownies? No one, that’s who. These ones have raspberries AND chocolate chips in them. They didn’t last long enough for me to try them with ice-cream, but I reckon that would have been pretty good, especially if the brownies were warmed slightly.

The recipe is from The Cook’s Companion by Stephanie Alexander. I made some slight modifications by adding the raspberries and cooking it in a smaller tin to make the brownies thicker.

Chocolate raspberry brownies
Makes 16, or however many squares you want to cut

180 g unsalted butter, melted
3/4  cup of cocoa
1  1/2 cups caster sugar
1/2 tsp vanilla extract
4 eggs, lightly beaten
2/3 cup plain flour
50 g dark chocolate, chopped
handful of raspberries (I used frozen)
pinch of salt

Preheat oven to 160°. Grease and line a 20 x 20 cm cake tin with baking paper.

Mix butter and cocoa in a small bowl, then add sugar, vanilla and eggs. Mix in remaining ingredients.

Pour into prepared tin and bake for 35-40 minutes, or until firm but still moist. You need to keep an eye on it, and I erred on the slightly underdone side, just because I like really soft brownies. If you use a bigger tin it might only take 20-25 minutes.

Allow to cool in tin completely. Dust with (lots of) icing sugar and cut into squares.


Salt scrub

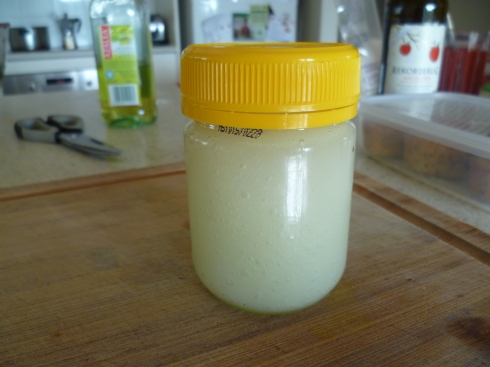
Salt scrub in jar

Last winter, I bought some salt body scrub at the West End markets. My skin is a big sook and doesn’t cope with dry weather (or cold, hot, or wet weather for that matter – I’m not quite sure what environment I’m really built for, but I suspect it’s indoors), but the scrub made it feel great. When it ran out, I bought a fancy beauty spa version of it from Mecca Cosmetica and I was also given a L’Occitane version for my birthday. Both of these were were really good too.

This year I was worried I wouldn’t have any (like, actually worried about this in the way someone might worry about something important), because of my limited finances. But after a bit of a look around the internets, I found a few recipes. I didn’t exactly follow any of them, but I did learn that the key (well, only) ingredients of salt scrub are salt and oil, and decided I could probably manage making it myself. When I did, I felt equal parts impressed with my resourcefulness and embarrassed that I’d bought it in the first place.

Salt scrub

Jar – I’ve found that one with a plastic lid or one of those latch-type lids is best
Fine salt – not the iodised stuff
Grapeseed oil – apparently you can also use almond oil, which I decided would be too expensive, or olive oil, but this can be a bit ‘oily’, whatever that means…
Essential oil – you can use whatever takes your fancy – I recommend rosemary

Combine the oil and salt and add a few drops of the essential oil. To avoid making too much of a mess, I suggest filling the jar about two thirds full of salt and then adding a bit of oil at a time and mixing with a knife until combined. You can then add more salt if it looks a bit oily. When it’s finished, it will form a kind of clumpy mixture, like this:

Salt scrub

Stir through a few drops of the essential oil, and that’s it.

To use it, rub about half a teaspoon of the scrub all over dry hands for about 10 seconds. Wash it off with warm water and dry your hands thoroughly. They should feel moisturised but not oily. You can also use it on your arms and legs, but be careful about how oily the floor gets when you do this. And it makes a nice gift. I mean, who wouldn’t be stoked to be given a Vegemite jar full of salt and oil?


Vegetarian spaghetti bolognaise, or thereabouts

Vegetarian spaghetti bolognaise

My boyfriend is vegetarian, but I’m not. This doesn’t actually cause any problems, it just means that when I cook dinner it’s almost always vegetarian. But when we go out, I almost always order meat. When they bring out our meals, wait staff almost always assume the meat is for him, not me. Is it really that unusal for a boy to order something vegetarian and a girl to order a steak?

Anyway. I made this dish once because I was hungry and spaghetti with a tomato sauce wasn’t going to cut it, so I threw in some lentils. And the result is something that approximates spag bol. If you give it to someone who hasn’t eaten meat for more than 10 years, they’ll believe you when you tell them that it’s almost exactly like spag bol. But tricking vegetarians isn’t the only reason to make it – it also happens to be tasty and filling. And cheap, which is important for a poor student like me.

Vegetarian spaghetti bolognaise
Serves 4. It should probably serve more, but we’re greedy.

This recipe really isn’t exactly what you’d call ‘precise’. I think I change it a bit each time I make it. You can throw in other vegetables too, like carrots, celery and mushrooms. It’s pretty hard to get it wrong.

about 1/3 packet of tubular spaghetti (it really is better with the tubes)
a tablespoon or so of olive oil
1 onion, chopped finely
4 cloves of garlic, chopped finely
a couple of teaspoons of oregano
a couple of teaspoons of dried chilli flakes (depending on how hot you want it)
2 bay leaves
salt and pepper
about 1/4  cup of red wine
about a cup of vegetable stock
a couple of tablespoons of tomato paste
1 tin of chopped tomatoes
2 tins of brown lentils, rinsed and drained
100 g fetta, crumbled
handful of parsley, chopped finely

Cook pasta according to packet instructions.

Heat oil in a large pan over medium high heat. Cook onions and garlic until soft. Add oregano, chilli, bay leaves and salt and pepper and stir for a few seconds until mixed through. Add wine, stock, tomato past and tinned tomatoes. Bring to the simmer for a few minutes. Add the lentils and simmer, stirring occasionally, until thick and spag bol-ish. This takes a few minutes. Add cooked, drained spaghetti and mix the lentils through. Stir through the fetta and parsley.

Sometimes we have this with extra cheese, which is really not necessary, but good nonetheless. I find that in pasta, as with in life, you can never have too much cheese.